Table of Contents
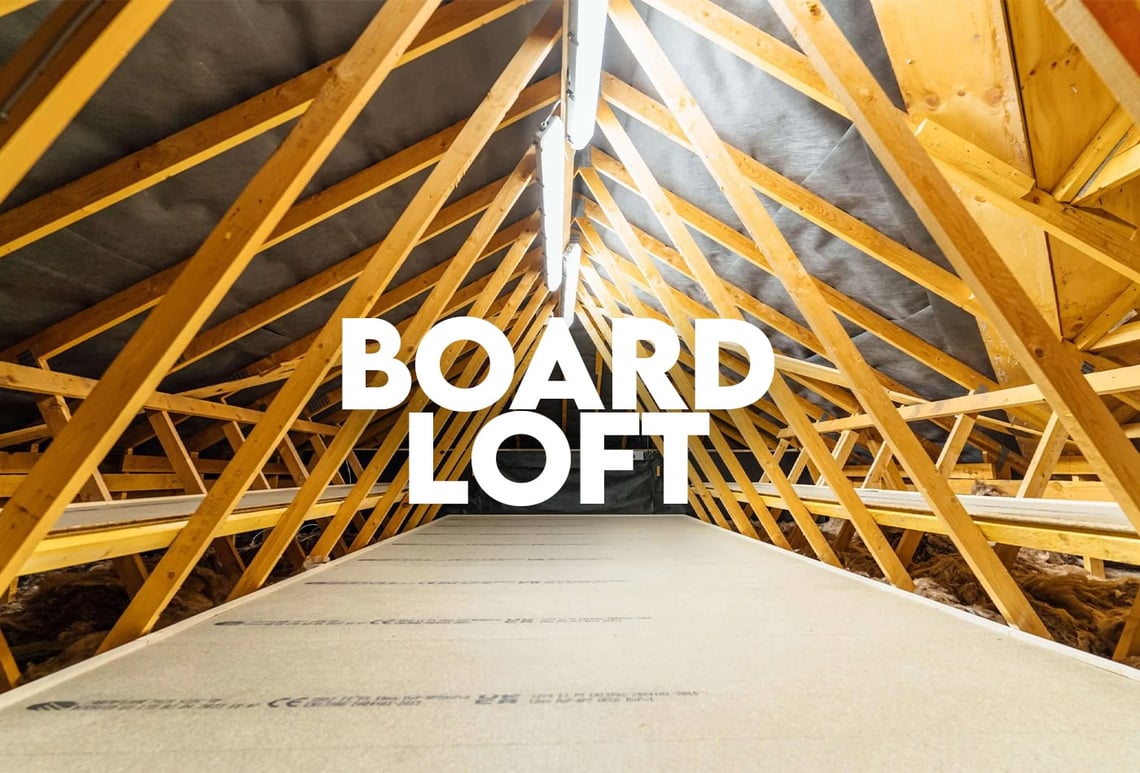
Our homes are our safe spaces, our havens, and our personal storage solutions. Most things we own are tucked away in our homes – tidied or otherwise – and stored for safe-keeping. After a few years of buying, cherishing and storing our belongings, space can quickly become something we need more of. We tend to hold onto nostalgic items. They are usually the things we want to keep but not necessarily display, and so we store them for safekeeping. One popular solution is to keep them boxed up in an attic, which is only possible if board loft is installed first.
What is a Board Loft?

A board loft involves laying down boards across the joists of your attic to create a usable floor. This process not only provides additional storage space but also ensures that your attic is safe and accessible. By installing a board loft, you can prevent heat loss, reduce clutter in your home, and make your attic a more functional area
How to Board a Loft
Measure Up
Work out the area that you need the boards to cover. Remember that most people only bother to board the central area of their loft, as the angle of the roof usually makes the edges less useful for storage and more difficult to access. Standard loft boards come in two different sizes; 2,400mm x 600mm and 1,220mm x 320mm; both of which are 18mm thick. Remember to make sure that the boards you decide on will actually fit through your loft hatch!
Get to Work
Put on your protective clothing and place a board between the ceiling joists to act as a temporary work platform. Start putting the boards in place. For better strength, boards need to be laid in a staggered pattern, so joins don't all line up and create a weak point. Take care not to trap any wires running through your loft and cut the boards to provide easy access to the tops of light fittings, which you are sure to come across.
Making it Permanent
Once you're confident that you have placed your loft boards in a way that provides a safe area to stand on and store your things, it's time to screw them into place. Drill 2 or 3 pilot holes along the edge of each board, lining up with the centre of the joist below and fix them into place with screws.
For more information, contact Calling 0330 113 5868 or email info@work-tops.com
SANT ANGELO SENSA
£439.67 Sant Angelo Sensa has a Ivory grey backdrop with black, white and ashy grey veins that adorn the stone. It is given a dazzling finish that makes a perfect addition in both residential and commercial settings. It is a dream… read more |
CEPPO DI GRE LIMESTONE
£468.71 Ceppo Di Gre Limestone consists of chaotic patterns of big, fossilised shells, micro pebbles, and mineral deposits embedded in a grey limestone structure, affording it a remarkable aesthetic. A popular choice for architectural and design applications, these natural flaws and… read more |
What Are the Benefits of Loft Boarding and Flooring?

Storage Made Easier
Many lofts are already used for storage, so you might not see the point of loft boarding your loft. However, lofts tend to be unsuitably designed to get the most out of them. Storing items in your loft can be a difficult and hazardous task. Usually whilst you’re standing on the ladder and trying to move items around! Boarding your loft will not only provide you with extra space.
It Helps to Increase the Value of Your Home
With storage space in the UK at a premium, the more space you have in your home, the more it’s worth. And the associated energy-efficiency gains add to that. And this is exactly what loft boarding provides for you. Having that extra space, whether it’s for storage or for everyday use, can really make a difference in the value of your home.
It Helps to Prevent Heat, and Money, Loss!
When you have loft boarding installed, extra loft insulation is usually put in place at the same time. That brings it up to the government-recommended standard of 270mm. Doing so could save you a whopping £590 per year! That will help to keep your home warmer in winter and cooler in summer and save you money at the same time.
Design Ideas for Your Board Loft
Cozy Retreat
Transform your board loft into a cozy retreat by adding comfortable seating, soft lighting, and warm decor. This space can serve as a quiet reading nook, a relaxation area, or a guest room.
Home Office
With more people working from home, a board loft can be the perfect solution for a dedicated home office. Install a desk, shelves, and ergonomic seating to create a productive workspace away from the distractions of the main living areas.
Playroom for Kids
Create a fun and safe playroom for your children by converting your board loft. Add colorful rugs, storage bins for toys, and child-friendly furniture. This space can be a great place for your kids to play, learn, and grow.
Hobby Room
Whether you enjoy crafting, painting, or building models, a board loft can be your creative haven. Set up workbenches, storage for supplies, and adequate lighting to fuel your hobbies and passions.
Installing a Board Loft

Assess the Attic Space
Before you begin the installation, assess the attic space to ensure it is suitable for a board loft. Check for any structural issues, such as damaged joists or inadequate support. It’s important to ensure that the attic can handle the additional weight of the boards and any items you plan to store.
Measure and Plan
Accurate measurements are crucial for a successful board loft installation. Measure the width and length of the attic to determine how many boards you will need. Planning the layout in advance will help you avoid any issues during installation.
ASTRAL AZABACHE OBSIDIANA
£336.40 ASTRAL AZABACHE OBSIDIANA is a black coloured, engineered surface material from the Obsidian series collection. It has a jet black background that is made to look like a constellation in space because of sparkling white dots of various sizes scattered… read more |
GREEN BEAUTY CROSS CUT MARBLE
£617.75 Green Beauty Cross Cut Marble is a visually pleasing green natural stone quite personating a rainforest theme. A hint of dark green shade, light green, with a hit of white here and there make them into a complete forest like… read more |
Choose the Right Boards
Select sturdy, high-quality boards that can support the weight and provide a durable surface. Plywood is a popular choice for board lofts due to its strength and affordability. Ensure that the boards are treated to prevent moisture damage and warping.
Install the Boards
Begin by laying the boards perpendicular to the joiNts. Secure each board with screws or nails, ensuring they are firmly attached. Leave a small gap between each board to allow for expansion and contraction due to temperature changes.
Insulate and Ventilate
Proper insulation and ventilation are essential for maintaining a comfortable and energy-efficient attic space. Insulate the attic floor to prevent heat loss and install ventilation to ensure proper airflow. This will help maintain a stable temperature and prevent moisture buildup.
P.s. The readers are informed that none of the content available on any of the pages of Work-tops.com should be taken as legal advice and that Work-tops will not be held accountable for your use of the information contained in or linked from these web pages.


